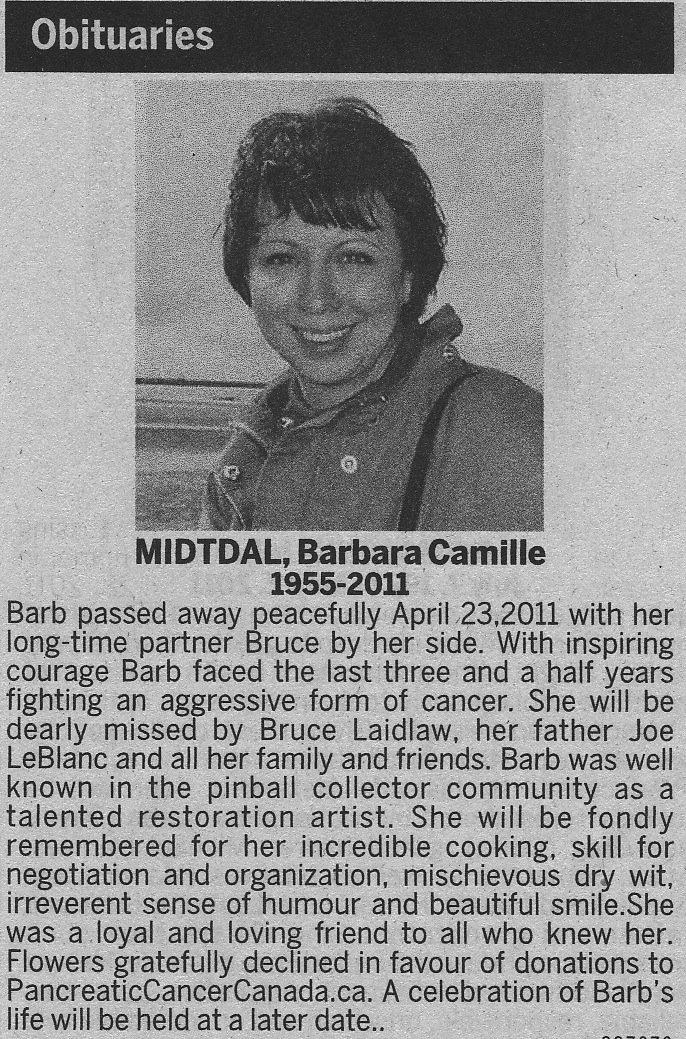
By Paul Midtdal and Barbara LeBlanc
(Dedicated to the memory of our late friend Paul Midtdal)
Our dear friend Barb has also passed away (April 23, 2011) - she will be greatly missed!
Playfield, cabinet, and backglass restoration is now handled at
the shop by Kaeli.
The most difficult aspect of pinball restoration is
backglass repair. If a game has electrical or mechanical
problems, it can be fixed, but if the backglass is shot, it
must either be replaced or restored. It's great if a
replacement can be found, but if restoration is required,
watch out. So far there has been no guidance for the
collector who wants to fix his glass, and we have all seen
the results of poor touchups... some repair jobs are worse
than no repairs at all. This article outlines a method of
backglass restoration that allows the average (ie: fanatical)
collector to do touchups that are unnoticeable to the naked
eye. The techniques discussed here are experimental. Before
you retouch a valuable game, we strongly recommend a lot of
practice on plain glass and on junkers. Only when you have
mastered materials and techniques should you approach a game
of any value.
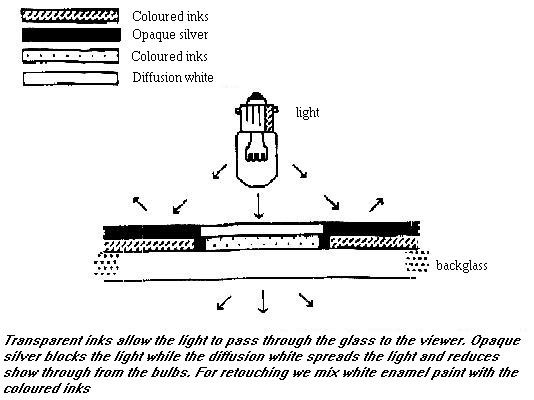
To repair a backglass, one must first understand how it
works. A backglass consists of inks silk-screened on glass.
Simple. Areas that light up on the backglass are back-
printed with a thin layer of opaque white that diffuses the
light from the bulbs. Areas that do not light up are back-
printed with a dense layer of solid silver or black that
prevents the transmission of light. A good restoration job
should restore the inks that are missing from the glass in
such a way that light is transmitted through the glass
correctly. To achieve this we must first duplicate the
missing inks, and second, apply them so that they transmit
light in an identical fashion to the originals. A good
repair or restoration job is apparent only upon close
examination and should never be noticed by the casual
observer. Standards vary with one's level of critical
expertise, but for a restoration to be considered successful,
it must pass a minimum level of notability. Blobbed on model
paint just doesn't make it. Backglasses can be restored if
the proper materials and techniques are used. To achieve
good results, materials as close as possible to the original
components must be used.
Materials
Our backglass paint box contains the following: white
enamel paint, brushes, a rubber roller, paint thinner, a
sturdy easel, a Pantone Matching System (PMS) book and the
following PMS inks:
Pantone Warm Red
Pantone Rubine Red
Process Magenta
Pantone Yellow
Pantone Reflex Blue
Process Blue
Pantone Green
Pantone Purple
Metallic Silver
Metallic Gold
Process White
Transparent White
Note: Pantone 'Pen Ink' can be obtained from PANTONE This is
NOT Printers Ink, but 'Pen Ink' has the same colours used in the
Pantone Colour Matching System..
These are transparent lithographic printing inks that can be
purchased at great expense in one pound cans from ink
suppliers, or, if you know a printer or pressman, can be
scrounged from any reasonably well stocked press room. Two
inch pill bottles with snap-on lids make ideal containers for
scrounged ink. The kit also contains miscellaneous Q-tips,
toothpicks, rags and jars.
CAUTION: These inks are permanent and indelible. If
they get on your clothing they will NEVER come out no matter
what you do. Always wear old clothes and an apron. Keep out
of reach of children and idiots!
Surface Preparation
The area to be painted should be cleaned with a damp
cloth and all loose or flaked paint should be gently removed.
This will make the glass look worse but is mandatory as your
touchup paints may run under lifted or loose areas. In lit
areas it may be advisable to remove the paint right back to
the black keyline that surrounds each letter or shape, but
experiment first.
Color Matching
The heart of the color matching system is the PMS Book.
This book is not unlike a book of paint chips that you might
find in a hardware store. It shows hundreds of colors and
gives formulas for mixing these colors. The PMS system is
used throughout the printing and silk screening industry.
Matching color on a backglass is relatively simple with this
system because this system is in fact used in the manufacture
of the backglass.
Color should be matched in a strong, indirect light (ie:
north-facing window). It may be helpful to block off all but
the area to be matched to minimize interference from
surrounding colors. Compare the color on the glass to the
colors shown in the book, and record the number and formula.
Color Mixing
The formulas given in the PMS Book break the components
into a number of equal parts (ie: 3 parts Rubine, 4 parts
Reflex Blue) and are also given in percentages. These
formulas are designed for mixing large volumes of ink, but
can also be used for mixing minute quantities. The formula is
used to begin the mixing, but the final match must be done in
comparison to the original paint remaining on the backglass.
Because the inks are transparent they must also be mixed
into a base of white enamel paint to make them opaque.
Darker colors require much less base paint than do light
colors, and colors mixed for lit areas have very little white
base paint. These are extended with transparent white ink and
thinned with paint thinner for spreadability.
We mix colors on disposable squares of coated card
stock. Only very minute quantities of ink are required.
Note that PMS inks do not mix well with latex paints, and
acrylic paint does not adhere to glass. Semi-gloss enamel is
the best base paint for these mixes.
Be careful not to contaminate one ink with another.
Always use a clean utensil (ie: a toothpick) when taking ink
from its storage container.
Application
A systematic method should be used for applying the
mixed paints. All of the black keylines should be done
first, followed by each color in succession and finished with
blockout silver or black where needed.
Keylines
The black keylines are perhaps the most important part
of the job, as they define the shapes and outlines of each
colored area. Inspect the glass and you will see that the
printed black lines have an even width or weight that should
be duplicated on the touchups. The clean edge of the line
must also be maintained. This is next to impossible if done
freehand, but low-tack tape and an exacto knife with a new
blade can be used to make a frisket that defines the edge of
the line. First, draw the line on the front side of the
glass. Then, lay the tape down on the painted side where you
see the line to be. Use the exacto to cut the image of the
line out of the tape. Overlap the ends of the existing
lines, being careful not to damage the old paint with the
knife. Now apply the black ink mix with a small brush in the
image area you have created, and remove the tape before the
ink dries. The width of the black lines is very important to
the overall effect of the finished job. Cartoon art can be
freehanded with a good brush, but a frisket should be cut for
all regular or geometric shapes.
Opaque Areas
Once the keylines are dry (overnight), proceed to the
unlit or opaque areas of the glass. Matched colors are mixed
and applied with a good brush on a well cleaned surface. Do
one color at a time. Paint up to the edge of the keylines,
and work from the center of the glass out to the sides. (This
keeps your elbows out of the work). Should you make an error,
remove the paint with a dry Q-tip or paper towel, and try
again. When dry, opaque areas should be backed up with a
layer of silver or black paint.
Lit Areas
Application of colors to lit areas is the most difficult
aspect of backglass restoration. The key to success here is
the even transmittal of light through paint. We have all
seen amateur touch-ups done with opaque model paints that
look fine until the lights are turned on, when they then show
up as dark and blotchy spots. Printer's inks are
transparent, and when mixed for lit areas they can be applied
to a thickness or density that transmits light of equal
intensity to the surrounding original areas. To maintain
consistent density, evenness of application is critical.
Uneven brush strokes show up as streaks when the lights come
on.
Crazed areas should be thinly touched with a fine brush.
Where the old and new paints touch a darker line will be
visible, but at least the lightbulb will not be seen. On
larger areas (up to the size of a quarter) the touch up paint
should be well worked on the glass for evenness of appearance
when lit. For very large areas, such as the name of a game,
it is advisable to remove all of the good ink right back to
the keylines. When the clean edge of the keyline has been
restored, use a small, soft rubber roller (brayer) to apply a
thin, even coat of the correct color. If necessary, use a
frisket to protect adjacent lit areas.
All of this may seem quite daunting to the novice, but
we know of no other system that allows the average collector
to do adequate restorations of otherwise dead glasses. The
biggest problem for most people would be to get the PMS book
and the inks. It was easy for us to get involved with glass
restorations because one of us works in the printing
industry and the necessary materials were close at hand, but
I don't know what a novice could do other than to impose upon
an acquaintance in the graphic arts trade or to buy the inks
outright, which could be prohibitively expensive. Ink is
sold by the pound, but after doing a dozen glasses we have
yet to make a dent in the original few ounces we scrounged
from the pressroom. Find someone to get it for you free.
Learning to handle the materials is the next main
problem. Experiment! If you don't have a good eye for
color, find someone who does. Do tests on plain glass, or
work on junkers. If you have buy an N.O.S. glass for a game,
experiment on the old original glass before you throw it out.
A dead glass is still good for experimenting on.
If you can get the ink and learn how to use it, the
biggest problem could be resisting the temptation to retouch
everything in sight. We firmly believe that any glass in
good original condition should be left that way. Classic
games shouldn't be screwed with, and minor flaws are
perfectly acceptable in older games. Some aging is expected
and desirable, and any game in good original condition is
more valuable than one that has been retouched. Save your
restorations for glasses that are otherwise beyond hope. A
good touchup can turn a beater into a keeper.
****
EXAMPLES
The game 2 IN 1 has a scratch in the background area
behind the titles. Using the PMS book we determine that the
color there is close to PMS 293. Using the given formula of
50% Reflex Blue and 50% Process Blue, we mix these inks into
the base paint until a near match is achieved. With a
toothpick a dot of this mix dabbed onto the scratch and
compared to the surrounding area. If the color is off, we go
back to our palette and adjust. When a perfect match is
achieved the scratched area is painted and allowed to dry
overnight. When dry, the retouched area is opaqued with
silver or black paint. When viewed from the player's
position, the touchup cannot be detected.
The 'R' indicator on the game CHAMPION has crazed and
left cracks through which the light bulb shows. Using the PMS
book we determine that the color is straight Pantone Purple.
Starting with the pure ink color, we add enough transparent
white to make the ink slightly translucent when spread
lightly on a white card. This mixture is thick so we thin it
with a bit of paint thinner. Thinner doesn't change the
color, but it makes it easier to apply. Too much thinner
will create a watery mess. We test the mixture by applying
it to the area to be repaired, holding it up to a light, and
checking the density. If it needs to be more opaque, we add
white enamel paint to the mix in very small increments and
keep testing until the correct opacity is achieved. If not
enough light shows through, we add more Transparent White
to the mix. The final mix is applied with a fine tipped
brush. Some unevenness of color appears where the new ink
abuts the remaining original ink, but this is unavoidable.
When the indicator lights up, the old and new inks have a
uniform appearance.
Pinball playfields are essentially the same except you do not need to worry about transparency. You use the same printers inks as in the backglass re-work.
 Click here to order Parts
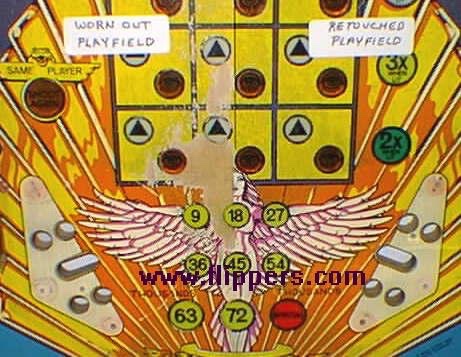
